암튼 이제 VCPKG를 업데이트 해야하는데.. 일단 먼저 VCPKG가 설치된 폴더로 이동합니다. cd 명령어로
저의 경우는 C:\dev\vcpkg에 있어서 이 명령어로!
cd C:\dev\vcpkg
그 후 아래 명령어를 입력해서 최신 레포로 업데이트 해줍니다.
git pull https://github.com/microsoft/vcpkg
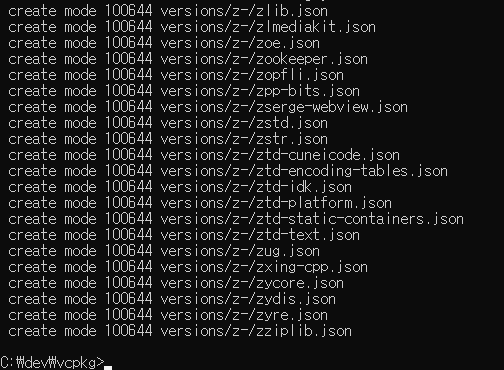
그 후에는 여러가지 파일을 다운받고 업데이트 하게 되는데 전부 다 되면 아래 사진처럼 끝납니다.
딱히 끝났다는 표시는 없다는 것..
이제 설치를 해야합니다!
설치는 아래 명령어로!
bootstrap-vcpkg.bat
설치한 후에는 이렇게 뜨는데.. 굉장히 별거 없다는..
Downloading https://github.com/microsoft/vcpkg-tool/releases/download/2023-12-12/vcpkg.exe -> C:\dev\vcpkg\vcpkg.exe... done.
Validating signature... done.

vcpkg package management program version 2023-12-12-1c9ec1978a6b0c2b39c9e9554a96e3e275f7556e

See LICENSE.txt for license information.
Telemetry
---------
vcpkg collects usage data in order to help us improve your experience.
The data collected by Microsoft is anonymous.
You can opt-out of telemetry by re-running the bootstrap-vcpkg script with -disableMetrics,
passing --disable-metrics to vcpkg on the command line,
or by setting the VCPKG_DISABLE_METRICS environment variable.

Read more about vcpkg telemetry at docs/about/privacy.md
암튼 그 후에 다시 버전을 확인해보면?!
vcpkg package management program version 2023-12-12-1c9ec1978a6b0c2b39c9e9554a96e3e275f7556e

See LICENSE.txt for license information.
그리고 혹시 업데이트 되면서 Visual Studio와 연결이 안될 수도 있으니.. 다시 입력합니다!
만약 vcpkg가 없는 명령어로 뜨면 환경 변수 설정이 안되거나 환경 변수 경로를 잘 못 지정했을 겁니다!
x64-windows는 vcpkg 패키지 리스트에서 보고 자기꺼에 맞는 걸로 선택하시면 됩니다!
이렇게 하면 모든 것이 설치 완료!!
이제 Visual Studio에서 include에서 사용하시면 됩니다!
// The contents of this file are in the public domain. See LICENSE_FOR_EXAMPLE_PROGRAMS.txt
/*
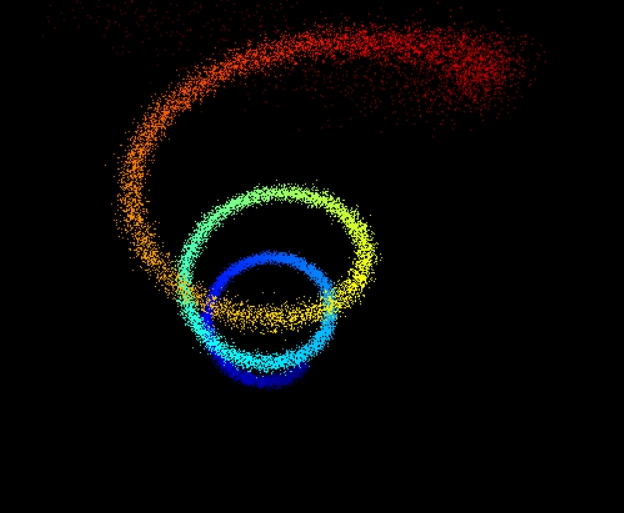
This is an example illustrating the use of the perspective_window tool
in the dlib C++ Library. It is a simple tool for displaying 3D point
clouds on the screen.
*/
#include <dlib/gui_widgets.h>
#include <dlib/image_transforms.h>
#include <cmath>
using namespace dlib;
using namespace std;
// ----------------------------------------------------------------------------------------
int main()
{
// Let's make a point cloud that looks like a 3D spiral.
std::vector<perspective_window::overlay_dot> points;
dlib::rand rnd;
for (double i = 0; i < 20; i+=0.001)
{
// Get a point on a spiral
dlib::vector<double> val(sin(i),cos(i),i/4);
// Now add some random noise to it
dlib::vector<double> temp(rnd.get_random_gaussian(),
rnd.get_random_gaussian(),
rnd.get_random_gaussian());
val += temp/20;
// Pick a color based on how far we are along the spiral
rgb_pixel color = colormap_jet(i,0,20);
// And add the point to the list of points we will display
points.push_back(perspective_window::overlay_dot(val, color));
}
// Now finally display the point cloud.
perspective_window win;
win.set_title("perspective_window 3D point cloud");
win.add_overlay(points);
win.wait_until_closed();
}
// ----------------------------------------------------------------------------
위 소스는 dlib.net의 기본 예제입니다.
위 소스를 Visual Studio에서 빈 프로젝트로 하나 만들고 소스 파일에서 test.cpp 하나 만들고 위 코드를 입력해서 실행해보시면 아주 잘 되는 것을 알 수 있습니다!
이런식으로 창이 나오면 잘 작동한다는 것이죠!
마우스로 회전도 되더라구요.. (그래프로 만들면 재밌겠다)
뭐 어쨌든 이 방식으로 설치했다면 빌드 폴더에 dll 파일도 나오는 경우가 있는데 이걸 같이 이동 시켜줘야지 다른 컴퓨터에서도 정상적으로 작동할 겁니다! (아무것도 설치 안되어있어도 잘 작동하더라구요.. 뭐 다른 한개는 설치해줘야 하긴 하는데..)
찾아보니 x64-windows-static 버전은 exe에다가 dll 파일 연결 안하고 모조리 다 때려 넣는 것 같군요! 하지만 설정은 더 힘드니 저 혼자만 하도록 하죠!